Flashing a 2006 Mac Pro with a 2007 Mac Pro SMC Firmware 

Disclaimer: This is totally unsupported! I won't be responsible if you Mac Pro catches fire or simply refuses to boot afterwards. I did the update on a 2006 Mac Pro, running the MP21.007F.B06 EFI firmware and 1.7f10 SMC firmware. Anything else, I can't guarantee.

Following MacEFIRom's work on his Mac Pro 2006-2007 Firmware Tool (you need to be registered to see the download link), here is a way to update the SMC, to complete the 2006-2007 conversion.

First, get the firmware update tool from Apple, at http://support.apple.com/kb/DL222 (md5 sum: 40c5e766f5b59c56501240f6cb732112).

Next, get the required resources from the included package/app:
- SmcFlasher.efi (md5 sum: 16d3c5337c0bfeb8549a034490617737);
- m43a.smc (md5 sum: 79aa57d97697860f70dbb37a1a6f7ee8).

SmcFlasher.efi is the EFI update tool, m43a.smc is the SMC firmware.

Then, using a hex editor, you'll have to modify the EFI updater, in order to bypass the hardware check (which prevents from flashing anything that doesn't follow the approved path).

Here's how a diff should look like. Sorry, but I won't host proprietary licensed binaries here.


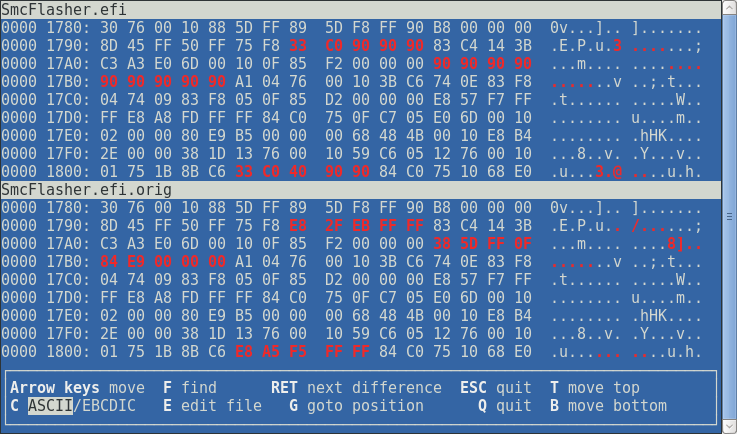
Here is the list of modifications you have to make:
- at 0x1797, replace 5 bytes with "33 C0 90 90 90";
- at 0x17AC, replace 9 bytes with "90 90 90 90 90 90 90 90 90";
- at 0x1805, replace 5 bytes with "33 C0 40 90 90".

The first 5 bytes replace the call to the function that checks whether the upgrade path is approved by Apple (isValidConfig) by xor eax, eax; nop; nop; nop.
The next 9 bytes replace a comparison and a conditional jump (related to a global variable set by isValidConfig) by 9 nops.
And the last 5 bytes replace the call to the function that prevents from downgrading the SMC firmware by xor eax, eax; inc eax; nop; nop.

If you edited the file properly, its md5 sum should now be 84dbe9708eafc0c29653414b06292f8e.

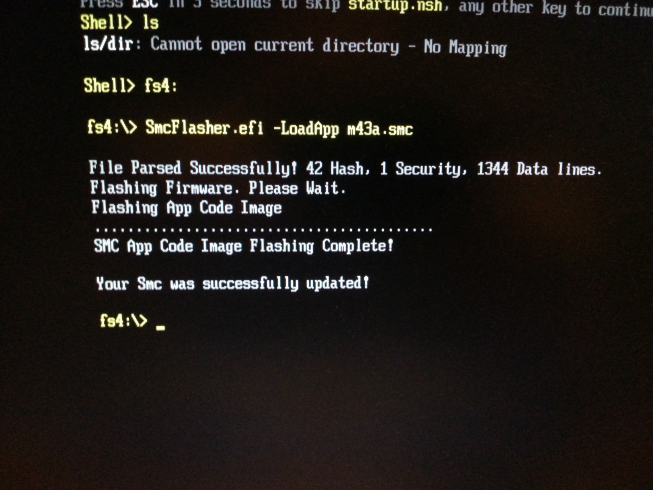
In order to use it, copy the two files to a EFI accessible partition (FAT or HFS), boot to the EFI Shell, and simply issue the command:
SmcFlasher.efi -LoadApp m43a.smc

To boot the EFI Shell, simply install rEFIt. you can also take a shell.efi binary (for instance, from rEFIt's tools), rename it to boot.efi and copy it at the root of a FAT formatted USB key. You can then boot the key using the Mac Pro built-in boot selector (holding Alt before the chime).


And voilà, you're set. Simply turn off your Mac Pro, reset the SMC, restart it, and start partying like it's 2007!


[ view entry ] ( 16313 views ) permalink
Handling magnet URIs with w3m 

Since The Pirate Bay moved from distributing torrent files to providing magnet links only, it became impractical to browse using w3m.
Here's a fix.

First, you'll need the following lines in your ~/.w3m/config file:
urimethodmap ~/.w3m/urimethodmap
cgi_bin ~/.w3m/cgi-bin

1st one points to a file that describes how to handle particular URI schemes.
2nd one points to a folder that will contain cgi scripts that w3m can handle on its own, acting as a HTTP server.

Then, you'll need to add a handler for magnet URIs in ~/.w3m/urimethodmap:
magnet: file:/cgi-bin/magnet.py?%s

And finally, a script that will handle the URIs, named ~/.w3m/cgi-bin/magnet.py:
#!/usr/bin/python
# coding=utf-8

import sys
import os
import subprocess

uri = os.environ.get('QUERY_STRING')
referer = os.environ.get('HTTP_REFERER')

if not uri:
print
print "Error: No URI"
sys.exit()

cmd_list = ("transmission-remote", "-a", uri)

subprocess.call(cmd_list)

if referer:
print "HTTP/1.1 303 See Other"
print "Location: %s" % referer

Don't forget to chmod +x ~/.w3m/cgi-bin/magnet.py, modify the cmd_list tuple to match your host, port, and authentication parameters, and you should be set. Hitting "Enter" on a magnet link should now add it to your queue.
[ view entry ] ( 15147 views ) permalink
How to flash a PC 4870 for a Mac Pro, using only Mac OS X 

This solution is so simple it will blow your mind away. Twice.

I have tested it on my 2006 Mac Pro, using a Sapphire 4870 with 512MB VRAM (early model, based on ATI's reference design). The machine is running Snow Leopard 10.6.1.

The test might be a little biased, as I originally installed Snow Leopard using the 4870 card. I only reflashed it with its original non-EFI BIOS for the purpose of this test.

You'll need the iMac Graphics Update 1.0.2 and Pacifist.

First, mount the graphics update image and use Pacifist to open it. You'll need to extract two files from here, using administrator privileges: ATIROMFlasher.kext and ATIFacelessFlash.app.

After extracting them, we'll first need to make sure the kext is able to load. Open a Terminal, and run "sudo kextutil -nt ATIROMFlasher.kext" to check whatever problems it might have.

On my system, it complained about authentication failures, and also showed a few warnings. The warnings can be ignored, but the auth issues have to be fixed, using those two commands: "sudo chown -R root:wheel ATIROMFlasher.kext" and "sudo chmod -R 644 ATIROMFlasher.kext".

Then, we'll remove the iMac firmwares from the archive: "sudo rm ATIFacelessFlash.app/Contents/Resources/*IMG" and add the correct firmware to the flash utility: "sudo cp 4870.ROM ATIFacelessFlash.app/Contents/Resources/".

Note: removing the other firmwares is only important if you have other ATI cards in your mac. When ran, the ATIFacelessFlash application looks for all files in the Resources directory, tries to find a match in your PCI devices, and when one is found, initiates the flashing. So it could "harm" one of your other ATI cards. And I don't know how it behaves with a 4870X2 card, *IF* it is seen by the system as two cards with the same ID, *BUT* each need a different firmware for the card to work fine. From a quick disassembly, I'd say that only the first one would be flashed.

Now, time to plug the PC 4870 card in your machine. I had it in the 1st PCI Excodess slot, with no display connected, and the 7300 GT that originally came with my Mac in the 3rd PCI Excodess slot, driving my display. I don't know if MacOS X can boot without any graphics card, but if it does, you could also use ssh instead of a second card, if you have a second machine available.

Restart your mac, and flash the card: "sudo kextload ATIROMFlasher.kext" (loads the interface to the card), "sudo open ATIFacelessFlash.app" (flashes the card. The app should appear in your Dock, wait for it to complete), "sudo kextunload ATIROMFlasher.kext" (unloads the interface).

Then reboot once more, and voilà, your 4870 is now a Mac card. No need to boot a FreeDOS CD, no need to create a FAT partition on your disks.
[ view entry ] ( 18086 views ) permalink
The Shitbot 

The company I'm currently working for is regularly growing, and it happens more often than before that you go to the bathroom, only to find it already occupied by someone else.

Someone in the company pointed us to a post on meebo's blog where they described having the same issue, and the way they fixed it, but without any technical details. We of course agreed that it would be nice to have something like this, and I started to think about it.

Since I had an unused Linksys WRT54GL, the project should be based on it. Then, I went shoppping for a cheap motion sensor, which happened to behave as a switch : current passes when it's idle, and the circuit is broken for about one second when a motion is detected.

Since I didn't want to do massive polling, I decided to put an RS latch between the sensor and the motion detector. It ended up looking like this:


- the white part is the motion sensor,
- the green part is the RS latch and inverters I added
- the blue part is (probably) the Linksys PCB : GPIOs and hardwired component,
- the orange part is (probably) where the CPU is on the PCB, with its actual GPIO pins.

I "hijacked" GPIO3 (the amber light) and GPIO4 (the Cisco button) to interface the CPU and the RS latch, and this is how it works:

- when the system is idle, both R, S and Q are Low, GPIO4 and GPIO4_INT are high (just like when the Cisco button is not pressed),
- when some movement is detected, S becomes High for one second, Q becomes and stays High, and GPIO4 and GPIO4_INT become Low (just like they would when the button is pressed)
- when a GPIO3 is put to Low for a short moment, the LED blinks, R becomes High then Low again, but Q becomes and stays Low, and the system is back to idle mode (previously memorized movements are forgotten).

Basically, the goal is: once a movement is detected, it is memorized until a reset is sent.

I then did the soldering part, as can be seen on the two following pictures, and closed back the Linksys case (with a simple 3 pins connector added to its side, going to the sensor, for power supply and the switch-like output)


I finally built a simple kernel driver, compiled it using OpenWrt's build system, that creates a file in /proc. When the file is read, it returns "0" if no movement was detected since the last reset, and "1" otherwise.

Then, two simple CGI scripts were added to the mix to expose this /proc file through HTTP. As this device can act as a wireless client, talks HTTP, and does not require frequent polling, it can now be integrated with any intranet technology the company is or will be using.

A prebuilt binary package and a source package are available for the driver.
[ view entry ] ( 12561 views ) permalink
Update: Mac Pro AHCI hack 

I recently received an email form Bela Lubkin, who pointed out some mistakes I made in my previous hack:

In grub-0.97_macrpro_esb2_ahci_stage1.patch, I happened to randomly notice a bug. (Ran across it while googling information to get my Dell notebook w/Ubuntu 8.10 to use ahci rather than ata_piix driver...)

The bug: you've moved the setup of the stack segment register (%ss) after the setup of the stack pointer (%sp). I don't have full context (didn't bother to find the stage1.S full file you're patching), so I don't know if it's OK that you are pushing %edx onto [%old-ss:$STAGE1_STACKSEG]. But probably not. But even worse is the "sti /* we're safe again */". Ancient 8086 mistake. You can't enable interrupts until the stack is setup correctly. Move the %ss setup code back to where it was.

I assume you moved it because you wanted to preserve the fact that %ax == 0 on exit of this bit of code. Well, I did find the grub 0.97 source to make sure: both %al and %ah are subsequently overwritten before being used. You don't have to preserve it.

You can save the whole push/pop %dx: find the comment "%dl may have been clobbered ...", move your code immediately before its `popw %dx; pushw %dx'. This does mean your hack isn't effective if grub is being booted from a floppy, but ... not a problem.

You can also save a few more code bytes. I assume this is being compiled as 16-bit (8086) code, e.g. with ".code16" GNU `as` directive. Thus, the instructions `push %edx' and `pop %edx' need a code32 prefix; replace with `push %dx; pop %dx'. Replace `mov $0xcfc,%dx' with `mov $0xfc,%dl'. Replace `xorl %eax,%eax' with `xor %ax,%ax'.


And he was even kind enough to send me a fix for these, so many thanks to him.

Here are links for the new patch he sent me, and an updated stage1 binary.
[ view entry ] ( 9074 views ) permalink

<Back | 1 | 2 | 3 | 4 | Next> Last>>