

The company I'm currently working for is regularly growing, and it happens more often than before that you go to the bathroom, only to find it already occupied by someone else.
Someone in the company pointed us to a post on meebo's blog where they described having the same issue, and the way they fixed it, but without any technical details. We of course agreed that it would be nice to have something like this, and I started to think about it.
Since I had an unused Linksys WRT54GL, the project should be based on it. Then, I went shoppping for a cheap motion sensor, which happened to behave as a switch : current passes when it's idle, and the circuit is broken for about one second when a motion is detected.
Since I didn't want to do massive polling, I decided to put an RS latch between the sensor and the motion detector. It ended up looking like this:
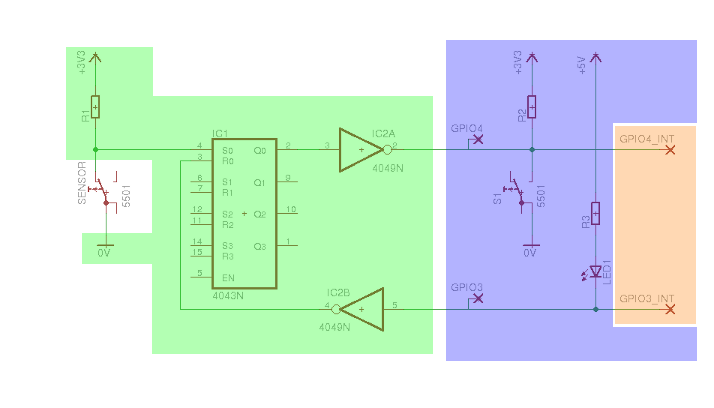
- the white part is the motion sensor,
- the green part is the RS latch and inverters I added
- the blue part is (probably) the Linksys PCB : GPIOs and hardwired component,
- the orange part is (probably) where the CPU is on the PCB, with its actual GPIO pins.
I "hijacked" GPIO3 (the amber light) and GPIO4 (the Cisco button) to interface the CPU and the RS latch, and this is how it works:
- when the system is idle, both R, S and Q are Low, GPIO4 and GPIO4_INT are high (just like when the Cisco button is not pressed),
- when some movement is detected, S becomes High for one second, Q becomes and stays High, and GPIO4 and GPIO4_INT become Low (just like they would when the button is pressed)
- when a GPIO3 is put to Low for a short moment, the LED blinks, R becomes High then Low again, but Q becomes and stays Low, and the system is back to idle mode (previously memorized movements are forgotten).
Basically, the goal is: once a movement is detected, it is memorized until a reset is sent.
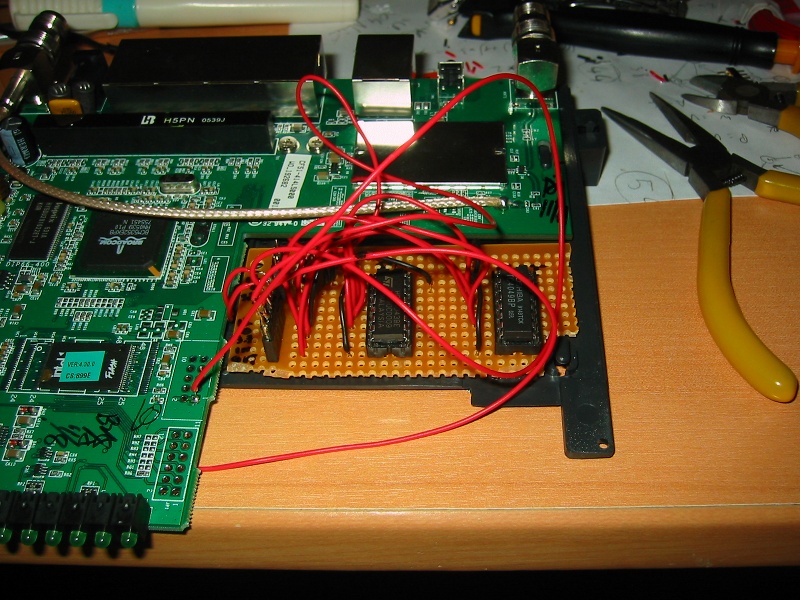
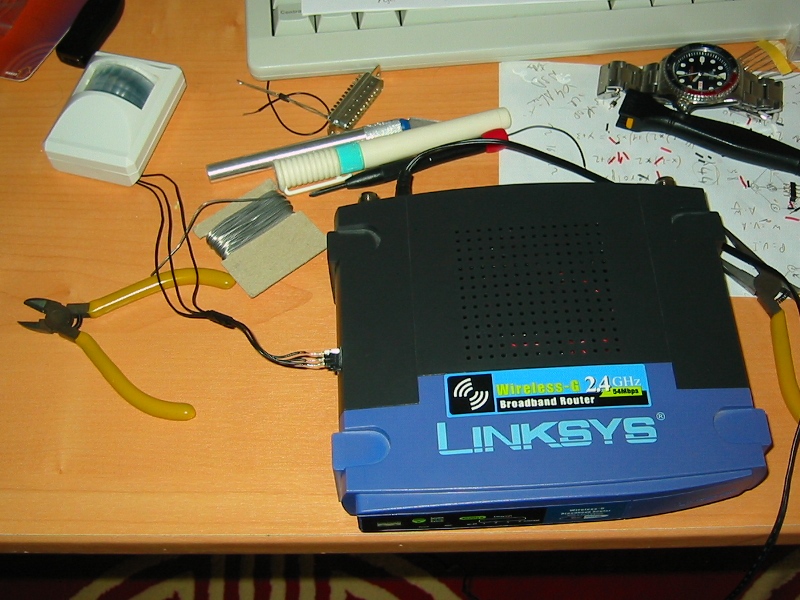
I then did the soldering part, as can be seen on the two following pictures, and closed back the Linksys case (with a simple 3 pins connector added to its side, going to the sensor, for power supply and the switch-like output)
I finally built a simple kernel driver, compiled it using OpenWrt's build system, that creates a file in /proc. When the file is read, it returns "0" if no movement was detected since the last reset, and "1" otherwise.
Then, two simple CGI scripts were added to the mix to expose this /proc file through HTTP. As this device can act as a wireless client, talks HTTP, and does not require frequent polling, it can now be integrated with any intranet technology the company is or will be using.
A prebuilt binary package and a source package are available for the driver.
Someone in the company pointed us to a post on meebo's blog where they described having the same issue, and the way they fixed it, but without any technical details. We of course agreed that it would be nice to have something like this, and I started to think about it.
Since I had an unused Linksys WRT54GL, the project should be based on it. Then, I went shoppping for a cheap motion sensor, which happened to behave as a switch : current passes when it's idle, and the circuit is broken for about one second when a motion is detected.
Since I didn't want to do massive polling, I decided to put an RS latch between the sensor and the motion detector. It ended up looking like this:
- the white part is the motion sensor,
- the green part is the RS latch and inverters I added
- the blue part is (probably) the Linksys PCB : GPIOs and hardwired component,
- the orange part is (probably) where the CPU is on the PCB, with its actual GPIO pins.
I "hijacked" GPIO3 (the amber light) and GPIO4 (the Cisco button) to interface the CPU and the RS latch, and this is how it works:
- when the system is idle, both R, S and Q are Low, GPIO4 and GPIO4_INT are high (just like when the Cisco button is not pressed),
- when some movement is detected, S becomes High for one second, Q becomes and stays High, and GPIO4 and GPIO4_INT become Low (just like they would when the button is pressed)
- when a GPIO3 is put to Low for a short moment, the LED blinks, R becomes High then Low again, but Q becomes and stays Low, and the system is back to idle mode (previously memorized movements are forgotten).
Basically, the goal is: once a movement is detected, it is memorized until a reset is sent.
I then did the soldering part, as can be seen on the two following pictures, and closed back the Linksys case (with a simple 3 pins connector added to its side, going to the sensor, for power supply and the switch-like output)
I finally built a simple kernel driver, compiled it using OpenWrt's build system, that creates a file in /proc. When the file is read, it returns "0" if no movement was detected since the last reset, and "1" otherwise.
Then, two simple CGI scripts were added to the mix to expose this /proc file through HTTP. As this device can act as a wireless client, talks HTTP, and does not require frequent polling, it can now be integrated with any intranet technology the company is or will be using.
A prebuilt binary package and a source package are available for the driver.